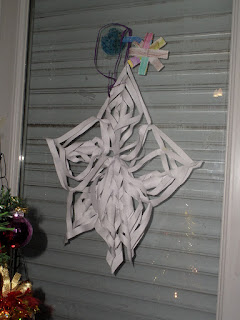
Juliette amazed me by creating this fabulous 3D paper snowflake all by herself the other day, using just a few sheets of printer paper, a tube of glue and a pair of scissors. Apparently she had learnt how to do it at afterschool club just before the holidays. I was suitably impressed and asked if she could show me how to make it so that I could share it here on my blog.
To start with, fold a sheet of A4 paper diagonally at right angles.
Cut off the excess to make a square
Pierre decided to join in as well !
Use a ruler to draw a line along the open edge 1.5cm in.
Mark off every 2cm along both edges.
Use the marks to draw horizontal lines all the way across. (Pierre gave up trying to make it and decided to just have fun by keep photobombing his sister instead !)
Cut along to the margin, making sure you don't go all the way across into the white bit.
Open up your sheet of paper.
Take the two edges of the innermost slits and glue (or sellotape if it doesn't stick properly) them together to make a tube shape.
Turn over the slowflake and repeat the process with the next set of slits.
Keep going, glueing together the matching edges and making sure you flip over the snowflake each time before moving on to the next one.
It should end up looking like this.
Repeat the whole process six or seven times them assemble them to create a snowflake shape.
They already look stunning but you could always add glitter or silver spray paint to give them extra bling or experiment with different types of patterned paper such as wrapping paper.


Oh wow, these look amazing - I love the idea of glittery snowflakes - we don't get enough snow and this is a nice way to have snowflakes!
ReplyDeleteWe might possibly be getting some snow next week - but I'll believe it when I see it !!
DeleteOh these are adorable. I have tried to make paper snowflakes for years but always failed. Thanks so much for sharing. Thanks for linking up to #ToddlersAndTeens over at Mummy2Monkeys
ReplyDeleteGood luck - she made it look so simple !
Delete